
Siding Paint Peeling in Austin, TX — Causes and Whether to Repaint or Replace
Peeling paint on siding gets treated as a painting problem. It’s almost never a painting problem. Paint fails on siding because something underneath it is failing — moisture cycling in and out of a wood-based substrate, an installation that left water entry points that paint can’t bridge, or surface prep that was skipped on the last repaint. Put another coat over it without fixing what’s underneath and it peels again, usually faster, while the substrate continues to deteriorate in the meantime. On fiber cement the story is different — early paint failure almost always points to an installation problem rather than a substrate breakdown, which is a more correctable situation but still not a painting problem. This page covers how to read what the peeling is telling you, how to distinguish a surface failure from a substrate failure, and when peeling paint means it’s time for replacement rather than another coat. For the full index of siding problems see the common siding problems overview.
The Real Causes of Peeling Siding Paint
Paint adheres to a surface when that surface is stable, clean, properly prepared, and not cycling moisture through it. When any of those conditions aren’t met, the paint film separates. On siding, the causes fall into three categories: substrate problems, installation problems, and application problems. The correct response depends on which category applies — and on most Austin-area homes with recurring paint failure, substrate or installation problems are the cause, not the painting.
Substrate Moisture Cycling
The most common cause on wood-based siding materials. When hardboard, T1-11, or wood siding absorbs moisture — at edges, seams, fastener holes, or grooves — and then dries out repeatedly, the expansion and contraction cycle breaks the paint film’s bond with the surface. The paint lifts from the substrate rather than from the top down. This is substrate failure, not paint failure.
Moisture Pushing Through From Behind
When moisture enters the wall assembly through failed flashing, missing WRB, or gaps in the building envelope, it migrates through the sheathing and substrate and pushes the paint film off from behind. The paint peels in sheets from the back surface — a distinct pattern from surface adhesion failure. If this is happening, repainting buys weeks, not years.
Installation Shortcuts on Fiber Cement
On James Hardie fiber cement, early paint failure is almost always an installation problem rather than a material or painting problem. Unsealed cut edges, overdriven fasteners that crack the board surface, unsealed penetrations, and missing back-priming on exposed edges all create moisture entry points that break paint adhesion on a short cycle. The Hardie product performs correctly — the installation didn’t.
Surface Preparation Failures
Paint applied over dirty, wet, chalky, or poorly primed surfaces fails adhesively — the paint never bonded correctly in the first place. This produces peeling that looks similar to substrate-driven failure but is localized rather than following the pattern of moisture entry points. Poor prep is correctable by stripping and repainting correctly, unlike substrate or installation-driven failure which requires addressing the underlying condition first.
Grade Contact and Capillary Moisture
Siding installed too close to finished grade wicks moisture from soil and hardscape directly into the bottom course. Paint at the base of the wall fails first and persistently — repainted repeatedly without improvement because the moisture source hasn’t changed. Grade contact is a common original installation shortcut on 1980s–1990s Austin homes and is almost always present alongside other moisture-related failures.
Age and UV Degradation
Paint on siding in Central Texas is exposed to intense UV radiation for the majority of the year. UV breaks down paint film over time — chalking, fading, and eventually adhesion failure — regardless of substrate condition. This is the one scenario where repainting is genuinely the correct response rather than a substrate correction. But UV-driven paint failure typically presents as uniform chalking and fading across whole elevations, not localized peeling at specific points.
Painting Problem vs. Substrate Problem — How to Tell the Difference
The diagnostic distinction that determines whether the right response is a new paint job or a replacement conversation is whether the paint is failing because of the paint — or because of what’s behind it. These two patterns look similar from a distance but have distinct tells.
✓ Signs It’s a Painting Problem
- Uniform chalking and fading across full elevations — UV degradation
- Peeling that lifts the top coat only, leaving primer intact underneath
- Failure distributed evenly regardless of elevation exposure
- No soft spots, no swelling, no moisture symptoms at affected sections
- Paint was applied over dirty or wet surfaces — adhesion never established
- Single coat applied without primer — film too thin for long-term adhesion
A painting problem is correctable with proper surface preparation and application. Strip to sound substrate, prime correctly, apply quality exterior paint.
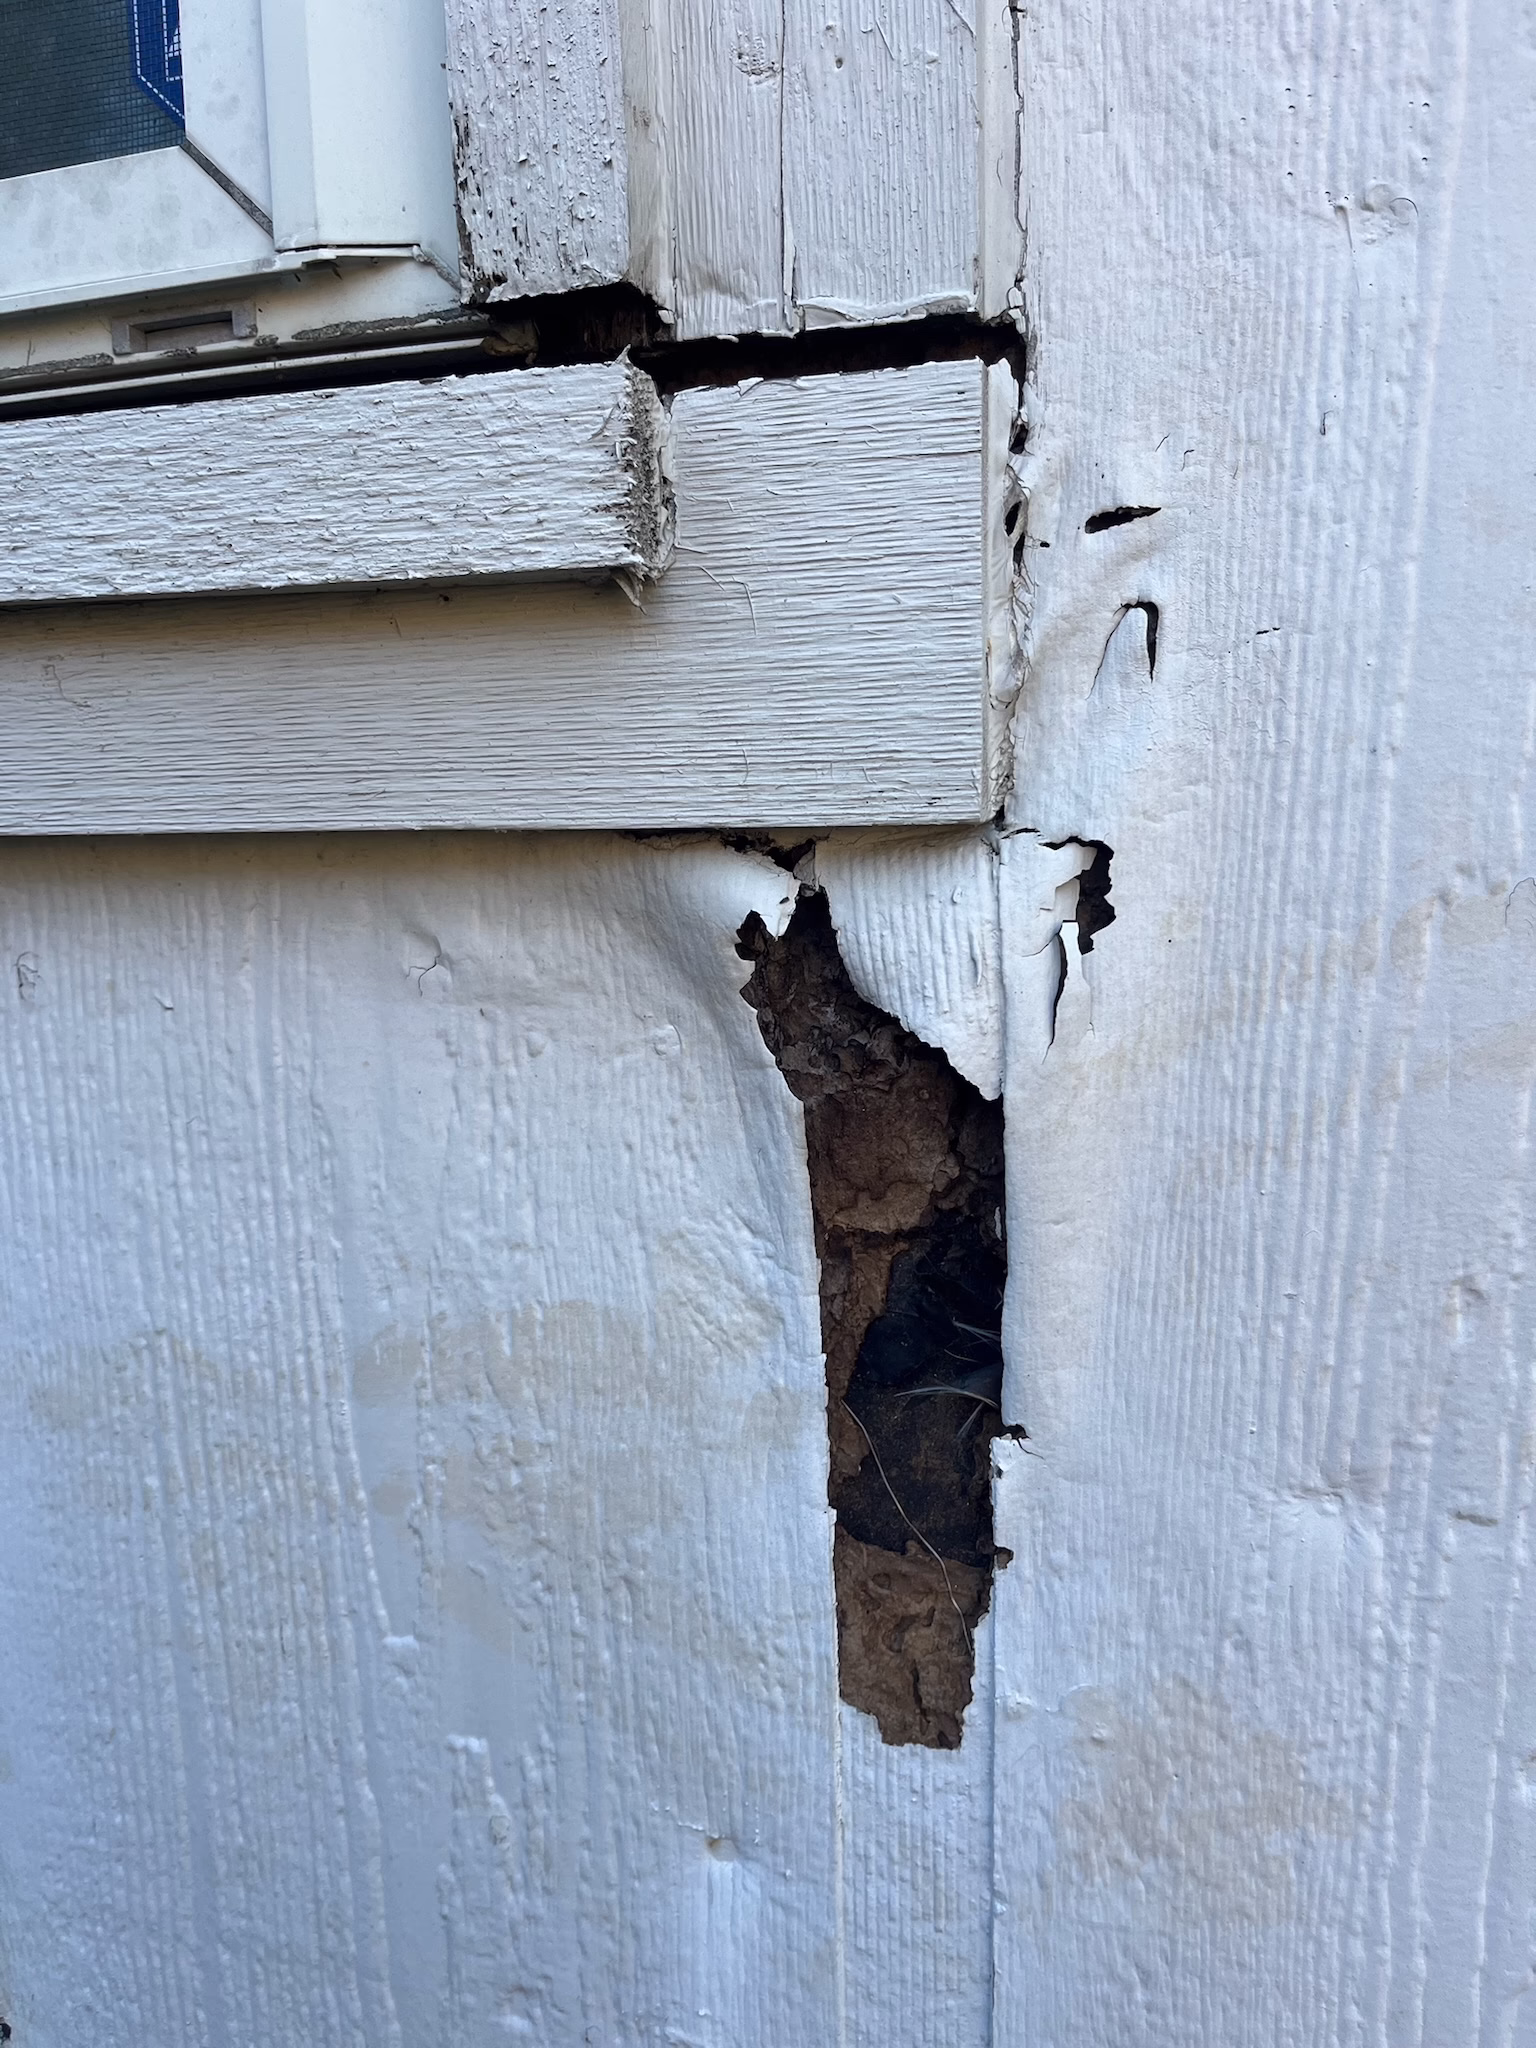
✗ Signs It’s a Substrate or Installation Problem
- Peeling concentrated at bottom edges, seams, grooves, and fastener holes
- Paint lifts with substrate fiber attached — the surface itself is breaking down
- Failure returns within 1–2 years after repainting in the same locations
- Soft spots behind or adjacent to peeling sections
- Swelling or buckling visible at edges where paint is failing
- Peeling on the back surface — moisture pushing through from behind
A substrate or installation problem cannot be solved by painting. Repainting delays the visible symptom while the underlying condition continues to worsen. See siding rot → for where this leads if unaddressed.
Paint Peeling by Material — What It Means on Each
The significance of paint failure varies by material. The same symptom — paint lifting at the base of the wall — has different implications on hardboard versus fiber cement versus T1-11, because the failure mechanisms and what comes next are different.
Hardboard — Stage 1 of Failure
Paint peeling on Masonite hardboard is the first visible sign of substrate breakdown — not a painting problem. The surface fibers are breaking down from moisture cycling, and paint adhesion fails as they do. Repainting at this stage is temporary. If not addressed, the sequence progresses to swelling, delamination, and rot. Early paint failure on hardboard is the window where replacement is still a straightforward scope — before structural involvement begins.
T1-11 — Groove and Edge Failure
On T1-11 siding, paint fails first at the routed grooves and bottom edges — the two locations where moisture entry is most consistent. The grooves collect water and direct it into the panel face. Once paint has failed at groove bases, moisture penetrates the OSB or plywood substrate with each rain event. Paint failure on T1-11 at grooves is a reliable early indicator of active substrate deterioration.
Fiber Cement — Installation Problem
Paint peeling on James Hardie fiber cement within the first few years of installation is almost always an installation problem. Unsealed cut edges, overdriven fasteners, missing back-prime on exposed ends, or unsealed penetrations create moisture entry points that break adhesion on a short cycle. The material didn’t fail — the installation did. Diagnosing which installation shortcut applies determines whether correction is possible without full re-siding.
Repaint or Replace — How to Make the Right Call
The repaint-vs-replace decision comes down to one question: is the substrate sound? If the material behind the paint is structurally intact, not moisture-damaged, and not past its service life, correct preparation and repainting is the right answer. If the substrate is compromised — swelling, soft spots, delamination, or active moisture cycling — repainting is a temporary cosmetic measure that delays a replacement conversation while the underlying condition worsens.
Identify the Pattern
Uniform chalking across full elevations — likely UV, repaint is correct. Peeling concentrated at edges, seams, grooves, and fasteners — substrate or installation problem.
Check for Soft Spots
Press firmly behind peeling sections. Any softness or give indicates moisture damage in the substrate — repainting won’t hold and replacement assessment is needed.
Check the History
How long did the last paint job last? Failure within 1–3 years of a repaint in the same locations is a reliable indicator of substrate or installation problems rather than painting quality.
Know the Material
Hardboard or T1-11 from the 1980s–1990s with recurring paint failure is almost certainly past its service life. Fiber cement with early paint failure needs an installation quality assessment.
Get an Assessment
If any of the above suggest substrate involvement, a professional assessment before repainting is the right sequence. Repainting over a failing substrate is money spent twice.
If the assessment confirms replacement is the right call, cost depends on material, home size, and what the substrate condition reveals at tear-off. A full breakdown is on the siding cost page. If warping or rot is visible alongside the paint failure, those pages cover the full failure sequence and what correction involves at each stage.
What Prevents Paint Failure on Correctly Installed Fiber Cement
On James Hardie fiber cement installed to preferred standard, paint should hold 10–15 years in Central Texas conditions before requiring attention. When it fails significantly earlier than that, the cause is almost always in the installation rather than the product or the paint. These are the installation details that determine paint longevity on fiber cement.
Installation Details That Protect Paint on Fiber Cement
- All cut edges sealed before installation — exposed fiber cement edges absorb moisture without sealing
- Fasteners driven to correct depth — not overdriven, not underdriven
- Back-prime on all field cuts and any edges exposed during installation
- Penetrations sealed at windows, doors, outlets, and fixtures before paint
- Grade clearance maintained — bottom board above soil and hardscape
- WRB installed continuously without gaps — no moisture path behind the boards
- Paint applied within Hardie’s specified timeframe after installation
When these details are done correctly, the paint system performs as intended. When they’re skipped, early failure is predictable — and it’s falsely blamed on the product. The full installation approach is covered on the siding installation process page.
Frequently Asked Questions
Why does my siding paint keep peeling in the same spots?
Recurring paint failure in the same locations is the most reliable indicator of a substrate or installation problem rather than a painting problem. Those specific spots have a persistent moisture condition — whether from grade contact, a failed seal at a seam or fastener hole, missing flashing above a window, or moisture pushing through from behind — that breaks paint adhesion regardless of how carefully the repainting is done. Identifying and correcting the moisture source is the necessary first step before any repainting holds.
Is it worth repainting siding that’s peeling, or should I replace it?
It depends entirely on the substrate condition. If the material behind the paint is sound — no soft spots, no swelling, no moisture symptoms — correct preparation and repainting is the right answer. If the substrate is compromised, repainting is money spent twice. The substrate condition is what drives the decision, not the appearance of the paint. On hardboard and T1-11 from the 1980s–1990s with recurring paint failure, the substrate is typically past its service life and replacement is the more cost-effective long-term answer.
My James Hardie siding is only a few years old and the paint is already peeling. What’s wrong?
Early paint failure on fiber cement is almost always an installation problem. The most common causes are unsealed cut edges that absorb moisture and break adhesion from behind, overdriven fasteners that crack the board surface and create moisture entry points, missing back-prime on field cuts, and unsealed penetrations at windows and fixtures. The Hardie product itself doesn’t cause early paint failure when installed correctly — it’s one of the most paint-stable substrates available for this climate. If this is happening on a recent installation, a professional assessment of the installation quality is the right starting point before any repainting.
How long should paint last on siding in Austin?
On correctly installed fiber cement with proper surface preparation and quality exterior paint, 10–15 years is a realistic expectation in Central Texas conditions before significant repainting is needed. On wood-based materials in good condition with correct preparation, 5–8 years is more realistic given this climate’s UV intensity. Paint that fails significantly before these ranges — particularly within the first 1–3 years — is almost always indicating a substrate moisture problem or an installation shortcut rather than a painting quality issue.
Can I paint over peeling siding or do I need to strip it first?
If repainting is the correct response — meaning the substrate is confirmed sound and the failure is paint-related rather than substrate-related — proper preparation requires removing all loose and peeling paint down to a sound surface before any new coat goes on. Painting over peeling paint produces a new layer that will fail at the same points on an accelerated timeline, because the adhesion failure underneath transfers through to the new film. Strip, prime correctly, then paint. Shortcuts in preparation are the most common cause of short-cycle paint failure on otherwise sound siding.
Siding Paint Failing? Find Out if It’s a Painting Problem or a Substrate Problem.
We’ll assess the substrate condition and tell you honestly whether repainting makes sense or whether you’re looking at a replacement conversation. Review our siding installation checklist or what to expect on your appointment before we talk.
- Substrate condition assessed before any recommendation is made
- No deposit required to get started
- Written scope before any work begins
- 10-year workmanship warranty on every installation