
Siding Rot and Soft Spots in Austin, TX — How to Identify It and What to Do
Rot in siding starts as a moisture problem and ends as a structural one. The cladding absorbs water, the substrate breaks down, and by the time it’s soft enough to notice from the outside the damage has often already reached the sheathing and framing behind it. On Masonite hardboard and T1-11 from the 1970s–1990s construction era, this sequence is common — and it’s frequently hidden behind vinyl siding installed over a failing substrate without removal, which means the first time it becomes visible is when someone presses on the wall and something gives. The critical diagnostic is whether the rot is confined to the cladding or has reached the sheathing and framing — that distinction changes the scope and cost significantly. This page covers how to identify siding rot, what stage it’s at, and what the correct response involves at each stage. For the full index of siding problems see the common siding problems overview.
How Siding Rot Develops
Rot doesn’t appear overnight. It develops through a sequence of moisture-related failures, each stage setting up the next. Understanding where in that sequence your home is determines the scope and urgency of the response.
Seal Failure
Paint, caulk, and surface seals fail at edges, fastener holes, and seams. Moisture finds its first entry points into the substrate.
Paint Peeling
Surface fibers begin to break down as moisture cycles in and out. Paint peeling is often the first visible sign — and commonly gets repainted over rather than investigated.
Swelling
Substrate fibers absorb moisture and expand. Swelling and buckling become visible at bottom edges, seams, and grooves.
Delamination
Material layers separate. The cladding surface loses structural integrity and actively allows water through to the sheathing behind it.
Rot — Cladding
Fungal decay sets in to the cladding material itself. Soft spots and spongy sections appear. The cladding must be replaced — but if caught here, the sheathing and framing may still be sound.
Rot — Structural
Moisture has reached the sheathing and framing. Structural repairs are now required before new cladding can be installed. This is the most expensive outcome and the one most often caused by delayed response at earlier stages.
The most consequential diagnostic question on any rot-related project is whether the rot is in the cladding only or has reached the structural components behind it. That determination can’t be made from the surface — it requires removing the cladding and inspecting what’s behind it, which is why a professional assessment before any scope is written is the right sequence.
How to Identify Siding Rot
Siding rot has a consistent set of visual and tactile signs. Not all of them are always present, and some are more diagnostic than others.
🔴 Signs of Active Rot
- Soft or spongy sections when pressed firmly — the most reliable indicator
- Discoloration — dark staining, gray or black patches on the surface
- Visible fungal growth or white/gray fuzzy patches at seams or edges
- Material that crumbles or breaks apart when probed with a screwdriver
- Sections that have pulled away from the wall or dropped from their original position
- Musty odor near the base of affected walls — particularly in still air
- Interior wall staining, moisture, or mold near affected exterior sections
Any of these signs warrant immediate professional assessment. Rot at the cladding surface typically indicates moisture has been present for months to years — what’s happening behind the surface may be more advanced.
⚠️ Early Warning Signs Before Rot Sets In
- Paint peeling repeatedly in the same locations despite repainting
- Swelling or buckling at bottom edges and seams
- Caulk cracking or separating at joints faster than normal
- Boards or panels that feel slightly soft without visible discoloration yet
- Water staining at the base of exterior walls after rain
- Grade contact — siding touching or very close to soil or concrete
These signs at stage 2–3 in the failure sequence. Addressing them before rot develops saves significant scope and cost.
Where Rot Concentrates on Austin-Area Homes
Rot doesn’t distribute evenly across a wall. It concentrates at specific locations determined by how moisture enters and where it collects. Knowing where to look makes early identification more reliable.
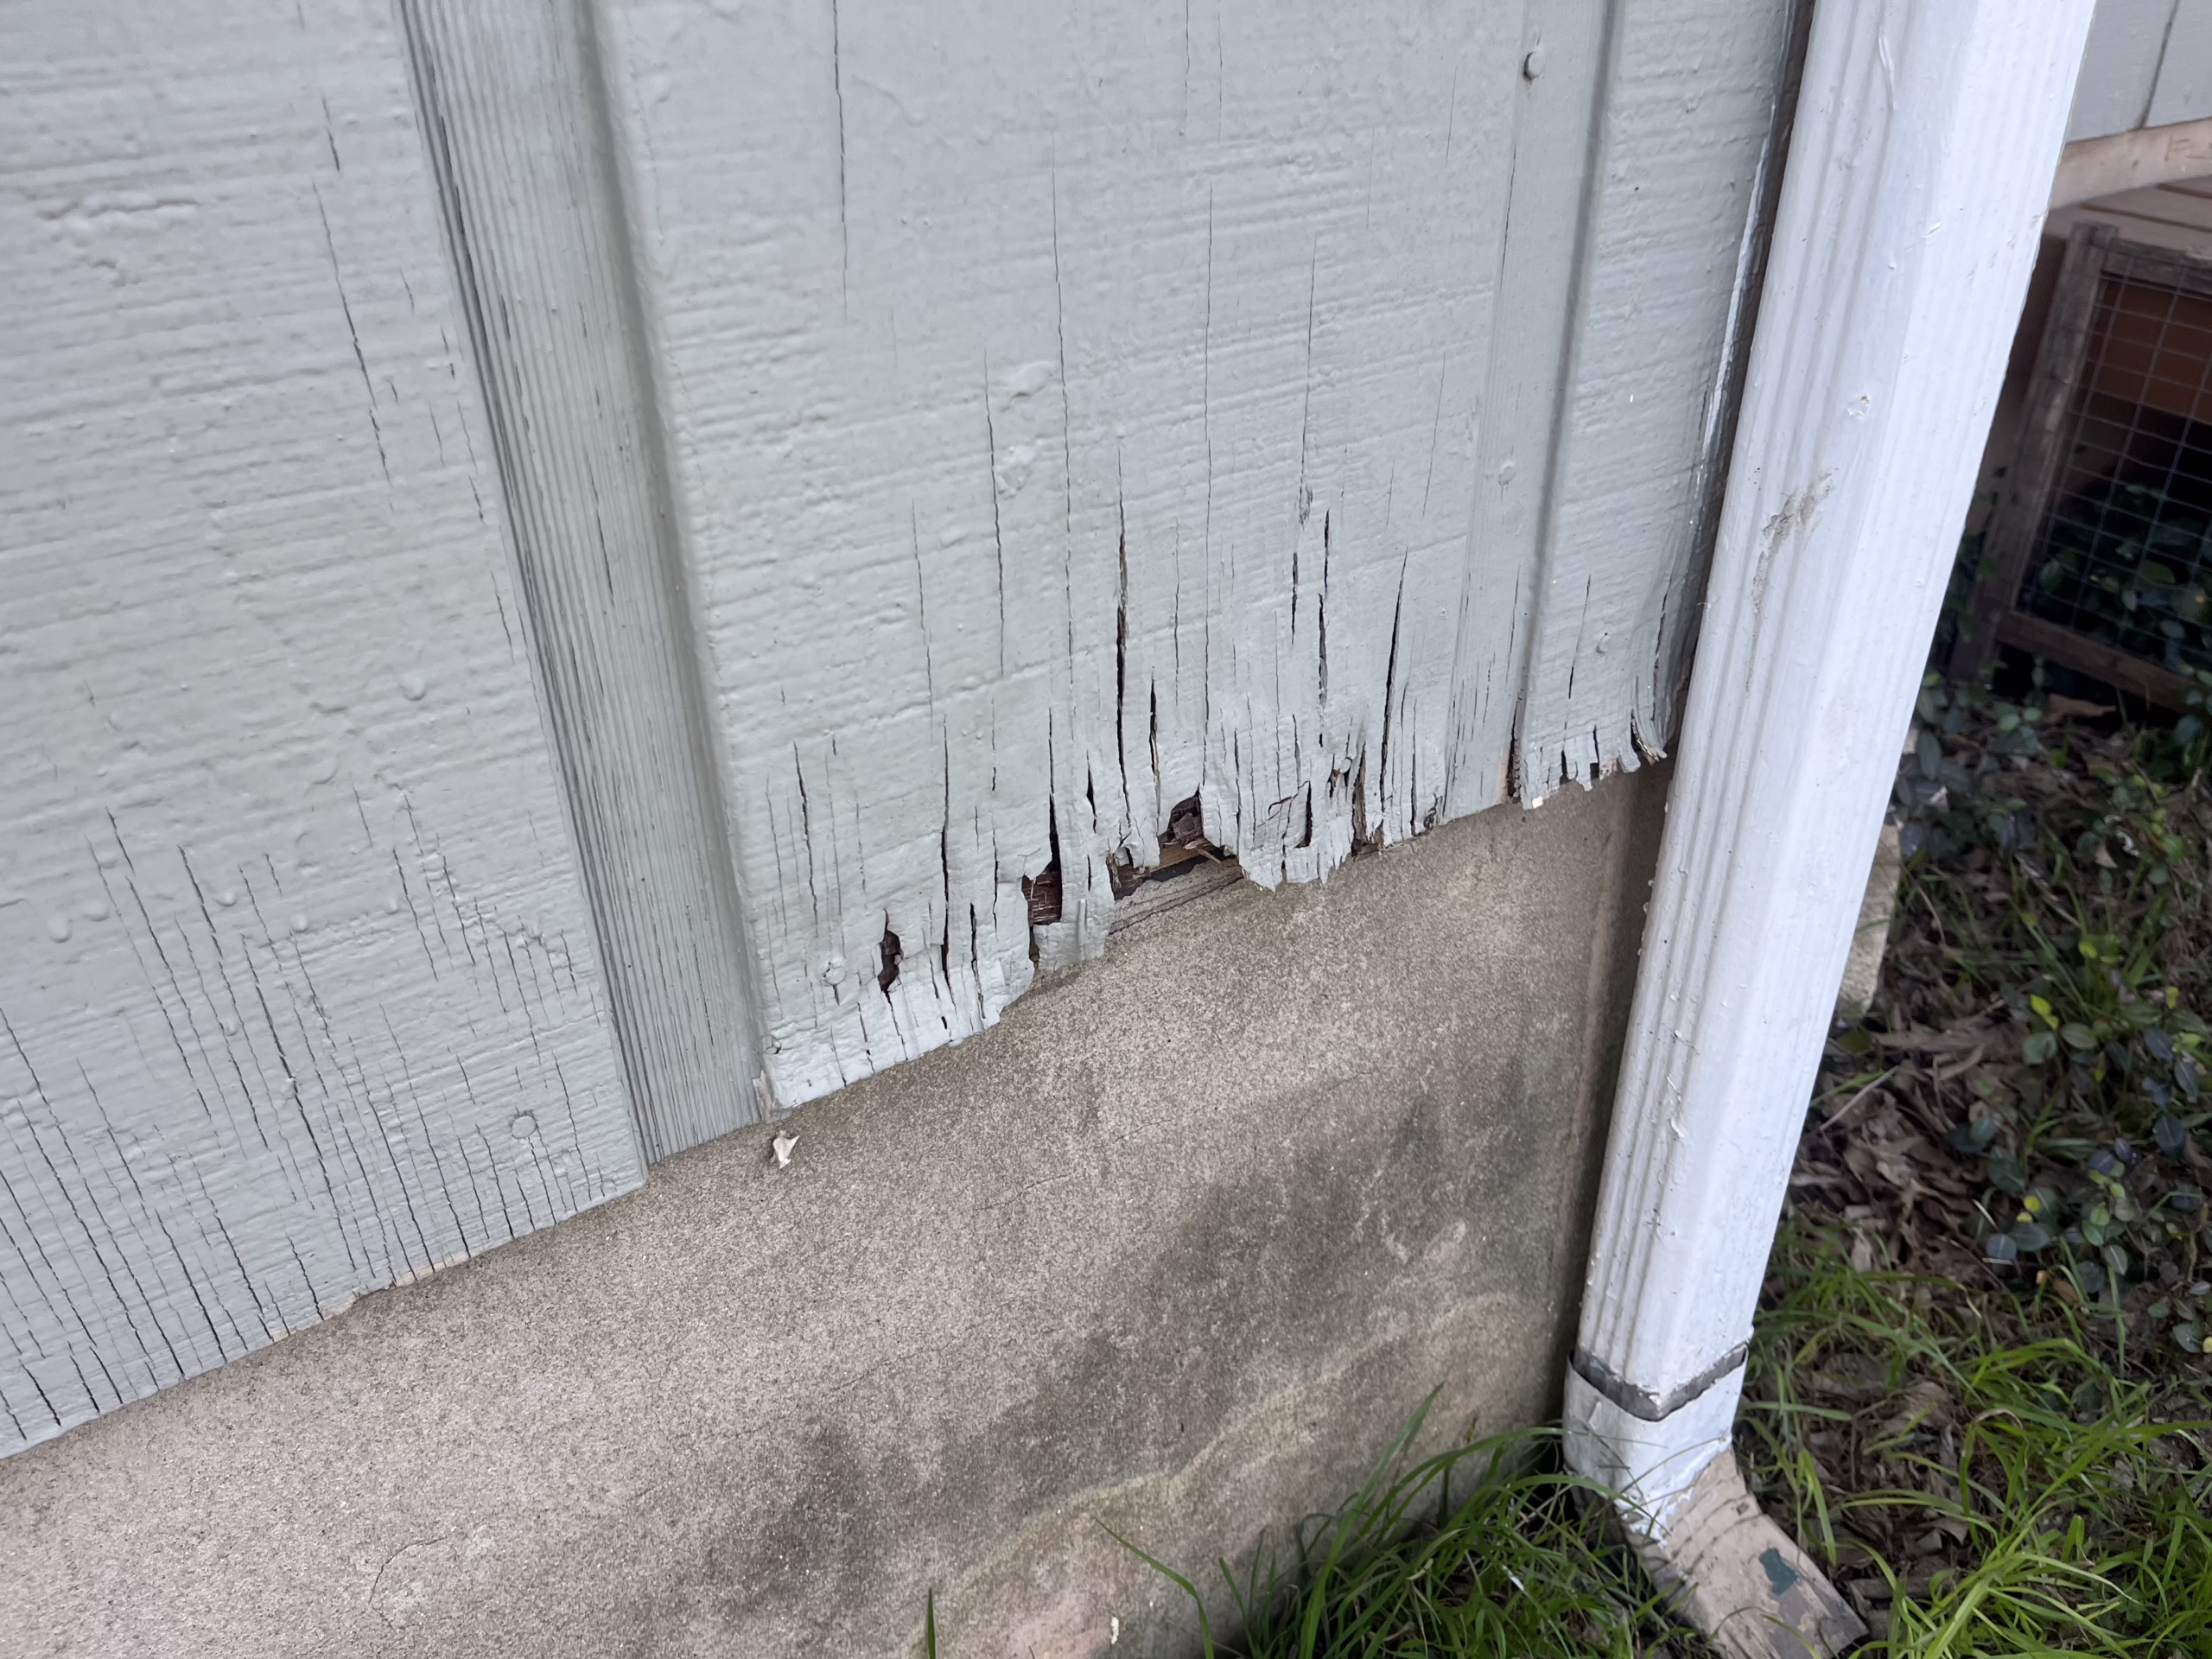
Bottom Courses — Grade Contact
The base of the wall is the most common rot location. Siding installed too close to grade wicks moisture from soil and hardscape directly into the bottom edge. On hardboard and T1-11, grade contact is often the primary rot initiation point. Correct installation requires a minimum clearance between the bottom board and finished grade — a detail frequently skipped on original 1980s–1990s installations.
Horizontal Seams and Z-Flashing Failures
On two-story installations, horizontal seams between panel sections require Z-flashing to direct water away from the wall. When that flashing was skipped, installed incorrectly, or has failed over time, the seam becomes a direct water entry point. Rot at mid-wall horizontal bands on T1-11 or hardboard is almost always a flashing failure.
Window and Door Surrounds
The intersection of siding and window or door trim is a high-risk location. Failed caulk, missing head flashing, and incorrect trim integration allow water to run behind the siding at these transitions. Rot at window corners and along door jambs is common on homes where these details were never correctly installed or have been neglected.
Hidden Beneath Vinyl
The most consequential rot location on Austin-area homes is behind vinyl that was installed over hardboard or T1-11 without removal. The substrate deteriorated with no ability to dry, no way for the homeowner to observe it, and — in many cases — with the vinyl’s moisture barrier actually accelerating the rot by sealing moisture in rather than out. By the time the vinyl comes off, rot in the hidden substrate is common and structural involvement is not rare.
Cladding Rot vs. Structural Rot — Why the Distinction Matters
The most important scope variable on any rot project is whether the damage is confined to the cladding or has reached the structural components behind it. The response and cost are significantly different.
✓ Rot Confined to Cladding
The cladding material has rotted but the sheathing and framing behind it are still structurally sound. Scope is full cladding replacement — tear-off, WRB, new fiber cement installation. This is the most straightforward rot scenario and the one where early intervention makes the most difference.
⚠ Rot Into Sheathing
Moisture has penetrated through the cladding and into the structural sheathing layer. Sheathing replacement is added to the scope before new cladding goes on. Cost increases moderately depending on extent. Still manageable if caught before framing involvement.
✗ Rot Into Framing
The most costly outcome — structural framing members have been compromised by sustained moisture contact. Framing repairs or replacement are required before sheathing and cladding can be installed. This stage is reached when rot at the cladding level is ignored or patched repeatedly rather than addressed. Every month of delay at stage 5 increases the probability of stage 6 involvement.
Why Rot Scope Can’t Be Fully Determined Before Tear-Off
The extent of rot — and whether it has reached structural components — cannot be fully assessed from the surface. Probing with a screwdriver gives a rough indication of cladding condition, but the sheathing and framing behind the cladding can only be properly evaluated after the cladding is removed. This is why we write scope in two phases on rot-affected projects: an estimated scope before tear-off and a confirmed scope after the wall condition is visible. We document everything we find with photos before proceeding, and you approve the confirmed scope before structural corrections begin.
The siding appointment page explains how this process works from first call through completion.
What Prevents Rot — and Why Most 1980s–1990s Installations Are Vulnerable
Rot is a preventable outcome. It requires sustained moisture contact with organic material — remove the moisture contact and rot doesn’t develop. The installation details that prevent that moisture contact are well understood and have been for decades. The problem is that many of them were routinely skipped on production housing from the 1970s through the 1990s because they added time and cost that builders weren’t willing to absorb.
Installation Details That Prevent Rot
Grade clearance — correct minimum distance between the bottom board and finished grade. Kickout and step flashing at every roof-to-wall transition. Head flashing above windows and doors. Continuous WRB without gaps or tears. Sealed cut edges and fastener holes. Z-flashing at horizontal seams. These are not optional details on a correctly installed system — they are the water management system that keeps moisture from reaching the substrate in the first place.
When we replace rot-affected siding, every one of these details is installed or corrected as part of the scope. That’s what separates a replacement that solves the problem from one that delays it. The full installation sequence is covered on the siding installation process page.
Frequently Asked Questions
How do I know if my siding has rot underneath it?
The most reliable field test is the screwdriver probe — press firmly on suspect sections, particularly at the base of the wall and around window and door surrounds. Sections that feel soft, spongy, or give more than surrounding areas have moisture damage. On vinyl-clad homes from the 1980s–1990s, there’s no reliable way to assess the substrate condition from the surface without removing a section of vinyl. If your home was built before the mid-1990s and has never had siding replaced, a professional assessment at trim transitions and seam edges can give a reasonable indication of what’s likely underneath before any commitment to full tear-off.
Can rotted siding be repaired rather than replaced?
Isolated rot confined to a small number of boards or sections — where the surrounding cladding is sound and the sheathing behind the affected sections is intact — can sometimes be addressed with partial replacement. The honest caveat is that rot in wood-based siding rarely stays isolated: the moisture conditions that caused it typically affect a broader area, and the adjacent material is often in the early stages of the same failure sequence. We’ll tell you clearly whether partial repair is genuinely the right answer or whether it’s a short-term measure before a larger scope becomes necessary.
How long does it take for siding rot to reach the framing?
It depends on the moisture volume, the material, and whether any surface maintenance has been done. In high-moisture situations — grade contact, failed flashing at a roof-to-wall transition, or vinyl sealed over wet hardboard — structural involvement can develop within a few years of cladding rot setting in. In lower-moisture situations with partial surface maintenance, cladding rot can be present for five to ten years before reaching the framing. There’s no reliable timeline that applies universally, which is why the answer to “how bad is it?” requires removing the cladding rather than estimating from the surface.
My home has vinyl siding — how do I know if there’s rot underneath?
From the surface, soft spots detectable through the vinyl at the base of walls and around window surrounds are the most accessible indicator. Water staining at the base of interior walls adjacent to exterior sections is a stronger sign that moisture has already penetrated significantly. The only definitive answer requires removing a section of vinyl for direct substrate inspection — which is what we do as the first step on every vinyl replacement project before any scope is written or material ordered. On Austin-area homes from the 1980s–1990s with original vinyl, substrate rot underneath is common enough that we treat it as a likely finding rather than a surprise.
How much does it cost to replace rotted siding in Austin?
Cladding-only rot replacement with fiber cement in the Austin metro typically runs $14 to $20+ per square foot — the same range as a standard re-side, because the installation scope is identical. Sheathing replacement adds to that depending on extent. Framing repairs are priced separately based on what’s found at tear-off and can range from a few hundred dollars for isolated stud repairs to significantly more for widespread damage. A full cost breakdown by project type is on the siding cost page. The accurate number for your home requires an on-site assessment — and for rot-affected projects, part of that number can only be confirmed after tear-off.
What siding material resists rot?
James Hardie fiber cement is the replacement material we install on rot-affected homes. Fiber cement has no organic content for fungal decay to consume — the Portland cement and sand substrate that makes up the material is not a food source for rot. Correctly installed fiber cement with proper grade clearance, flashing, and WRB eliminates the conditions that cause rot in wood-based materials. It doesn’t eliminate the need for correct installation — water management details still matter — but the material itself is not vulnerable to the failure sequence that produces rot on hardboard, T1-11, and wood siding.
Think You Have Rot? Find Out How Far It’s Gone Before It Gets Worse.
We’ll assess what’s there, document what we find, and tell you honestly whether you’re looking at a cladding replacement or a structural repair — before any scope is written or work begins. Review our siding installation checklist or what to expect on your appointment before we talk.
- Substrate and framing condition assessed before scope is written
- No deposit required to get started
- Written scope before any work begins
- 10-year workmanship warranty on every installation